Getting started
Create an API token
Generate a gg_ token for a repo so your app, server or agent can send reports into it
Steps checked September 12, 2026
A token (gg_…) is how your app, your server or an agent tells Glitchgrab which repo a report belongs to. One token is one repo, always. It is not a login and it is not secret: it ships in your app's JavaScript. The rest of this guide covers keeping it from being abused.
Before you start
- Your GitHub org is connected and the repo shows on Repos (see Connect your GitHub org).
- You are signed in to the Glitchgrab dashboard.
Create the token
- Open API Tokens in the left sidebar. Tokens are on the SDK tokens tab, which opens first. The Server keys tab next to it holds a different, secret key; see Which token for what below.
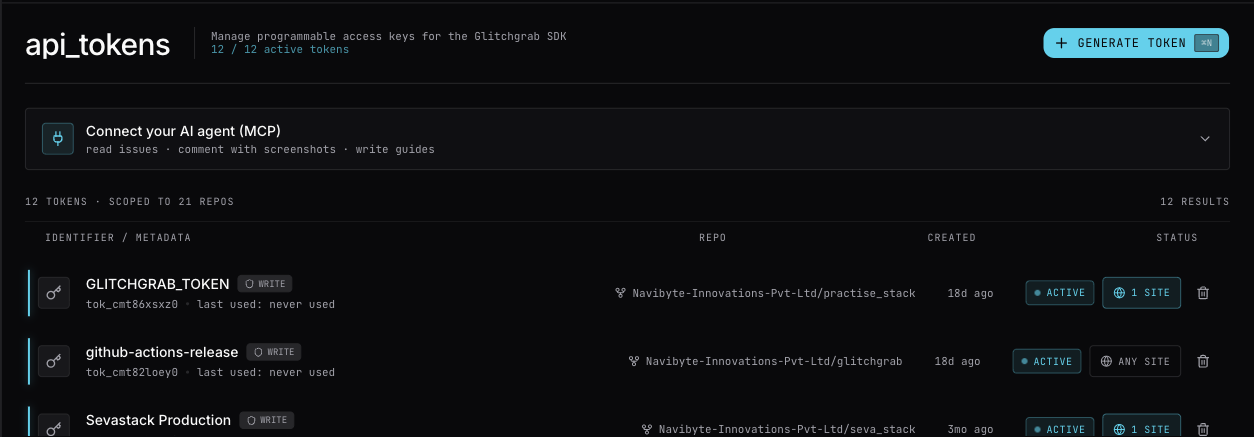
- Press Generate Token at the top right.
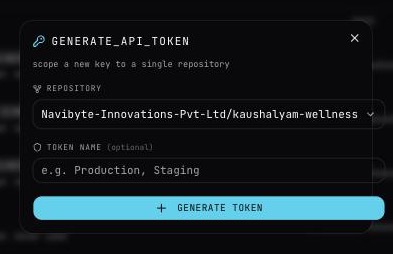
- Under repository, pick the repo reports should go to. Type to search if you have many.
- Under token name (optional), give it a name you will recognise later, such as
Production,StagingorGitHub Actions. If you leave it blank, it is saved asDefault. - Press Generate Token.
- The dialog now shows token_generated, with copy now, this is shown exactly once. Copy either:
- the token itself, or
- the .env line, ready to paste:
NEXT_PUBLIC_GLITCHGRAB_TOKEN=gg_…
- Press Done.
If you close the dialog without copying, the token cannot be shown again. Delete it and generate a new one.
Use it
In a Next.js app, put the .env line in your environment and pass it to the provider:
<GlitchgrabProvider token={process.env.NEXT_PUBLIC_GLITCHGRAB_TOKEN!}>
  {children}
</GlitchgrabProvider>
The full setup is in Add Glitchgrab to your Next.js app.
Which token for what
| Where it runs | Use |
|---|---|
| Your web app (browser) | a gg_ token, in a NEXT_PUBLIC_ variable |
| Your server, cron jobs, workers | a gg_ token in a server env var (GLITCHGRAB_TOKEN) |
| CI, or an AI agent with no browser | a gg_ token in the Authorization header |
| Writing guides from your own server | not a gg_ token. Use the project's server key from API Tokens → Server keys (see Write guides from your own server) |
| Showing shared calls in your own admin panel | not a gg_ token. Use the same server key (see Share a call with your client) |
Making one token per environment (Production, Staging, CI) means you can revoke one without breaking the others.
Keep a copied token from being abused
Anyone can copy a gg_ token out of your app's bundle. On its own, it can only file reports into that one repo, but the AI features cost money on every call. Two controls help:
- Limit it to your sites: press the any site chip on the token's row and list your domains. See Limit a token to your own websites.
- Signed users: set this on the repo card so only your logged-in users can use the AI features. See Require signed-in users for AI features.
Rate limits per token and per IP address are always on; there is nothing to configure.
Revoke a token
Press the trash icon on the token's row. It is deleted immediately, with no confirmation. Any app still using it stops being able to file reports, so put the new token in place first.
Troubleshooting
- "Invalid API token": the token was revoked or mistyped. Generate a new one.
- "Token expired": the token had an expiry date. Generate a new one.
- Reports arrive but no GitHub issue appears: the token is fine, but the GitHub App is not installed on that repo. See A report did not become a GitHub issue.