Guides and AI agents
Write guides in the dashboard
Create, edit, verify and publish step-by-step guides that the AI assistant sends people to and your site can show
Steps checked September 12, 2026
Guides are step-by-step how-tos for your product, like this one. You write them once, and they are used in three places:
- The AI report assistant reads every published guide and sends people to the right one instead of filing a report.
- Your own website can show them (see Show guides on your own site).
- Your team reads them in the dashboard.
Who can write
The repo owner or the org owner. Other members can read guides but not write them.
Open Guides
Open Guides in the left sidebar. Pick a project from the chips at the top; each chip shows how many guides the project has. The line under the project name counts published and draft guides. Category chips below filter the list.
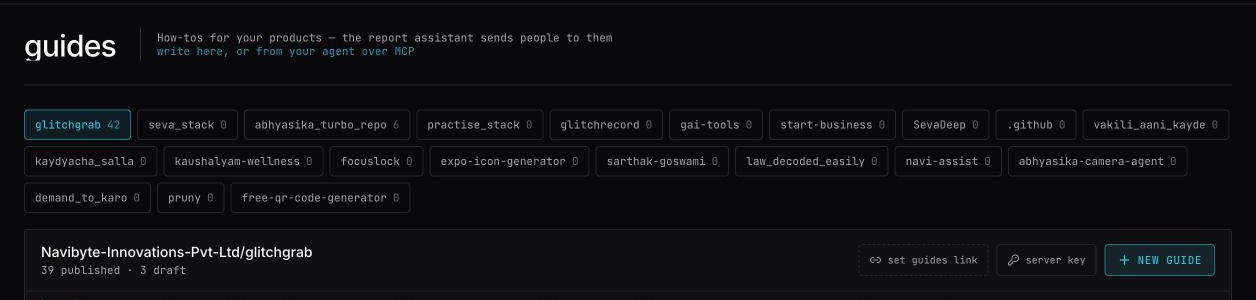
The server key link opens API Tokens → Server keys. You only need it to write guides from your own code (see Write guides from your own server).
Write a guide
- Press New guide (or Write the first guide on an empty project). The new_guide editor opens.
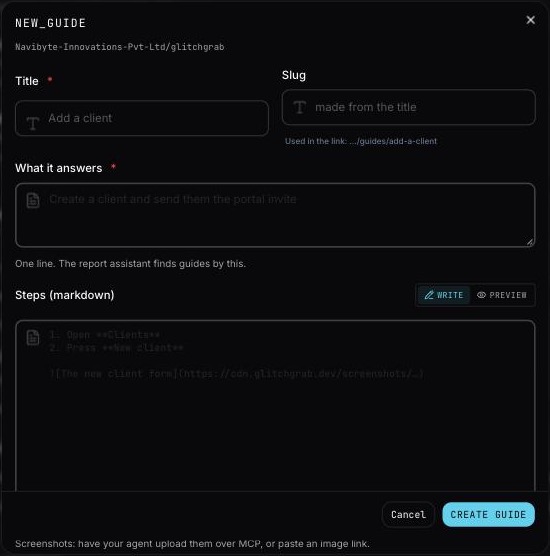
- Title: what the reader wants to do, in their words. Write Add a client, not Client creation flow.
- Slug: leave it empty and it is made from the title (
add-a-client). It becomes the end of the guide's link. - What it answers: one line. The assistant finds guides by this line, so write it the way a confused user would ask, for example Create a client and send them the portal invite.
- Steps (markdown): the guide itself. Use numbered steps, bold for the exact button names, and headings for sections. Press PREVIEW to see it rendered and WRITE to go back.
- Link on your site: where readers open this guide on your own website. Leave it empty to use the project's guides link plus the slug.
- Category: a group such as Billing. Guides are listed and filtered by category.
- Status:
- Draft — only your team sees it
- Published — the assistant and your site use it
- Press Create guide. You will see Guide created.
Add screenshots
Screenshots go into the steps as markdown images:

The image must be at a public web address. The easiest way is to let your AI agent write the guide over MCP; it uploads the screenshot and embeds the link for you (see Connect your AI agent to Glitchgrab (MCP)).
Always fill in the text in the square brackets. The assistant cannot see images, so it reads that text instead.
Set the project's guides link
Your website may list guides at one address, for example https://www.example.com/guides. If so, press set guides link at the top of the project and enter it. Every guide without its own link then points to that address plus its slug.
Without a link, a guide shows no link · assistant only. The assistant uses its steps but has nothing to send the reader to.
Edit, verify and delete
Click a guide in the list to open it.
- Change anything and press Save guide.
- Tick I checked these steps against the product today once you have walked through the steps again. The list then shows verified <date>, so you can see which guides have gone stale.
- Delete → Sure? Delete removes it.
Write guides that get used
- One task per guide. Add a client and Invite a client to the portal are two guides.
- Name the real buttons, exactly as they appear.
- Start with "Before you start": what must already be true.
- End with troubleshooting: the messages people see and what they mean.
- Check the "N unanswered" list on the Repos page. Each question there is a guide nobody has written yet.